
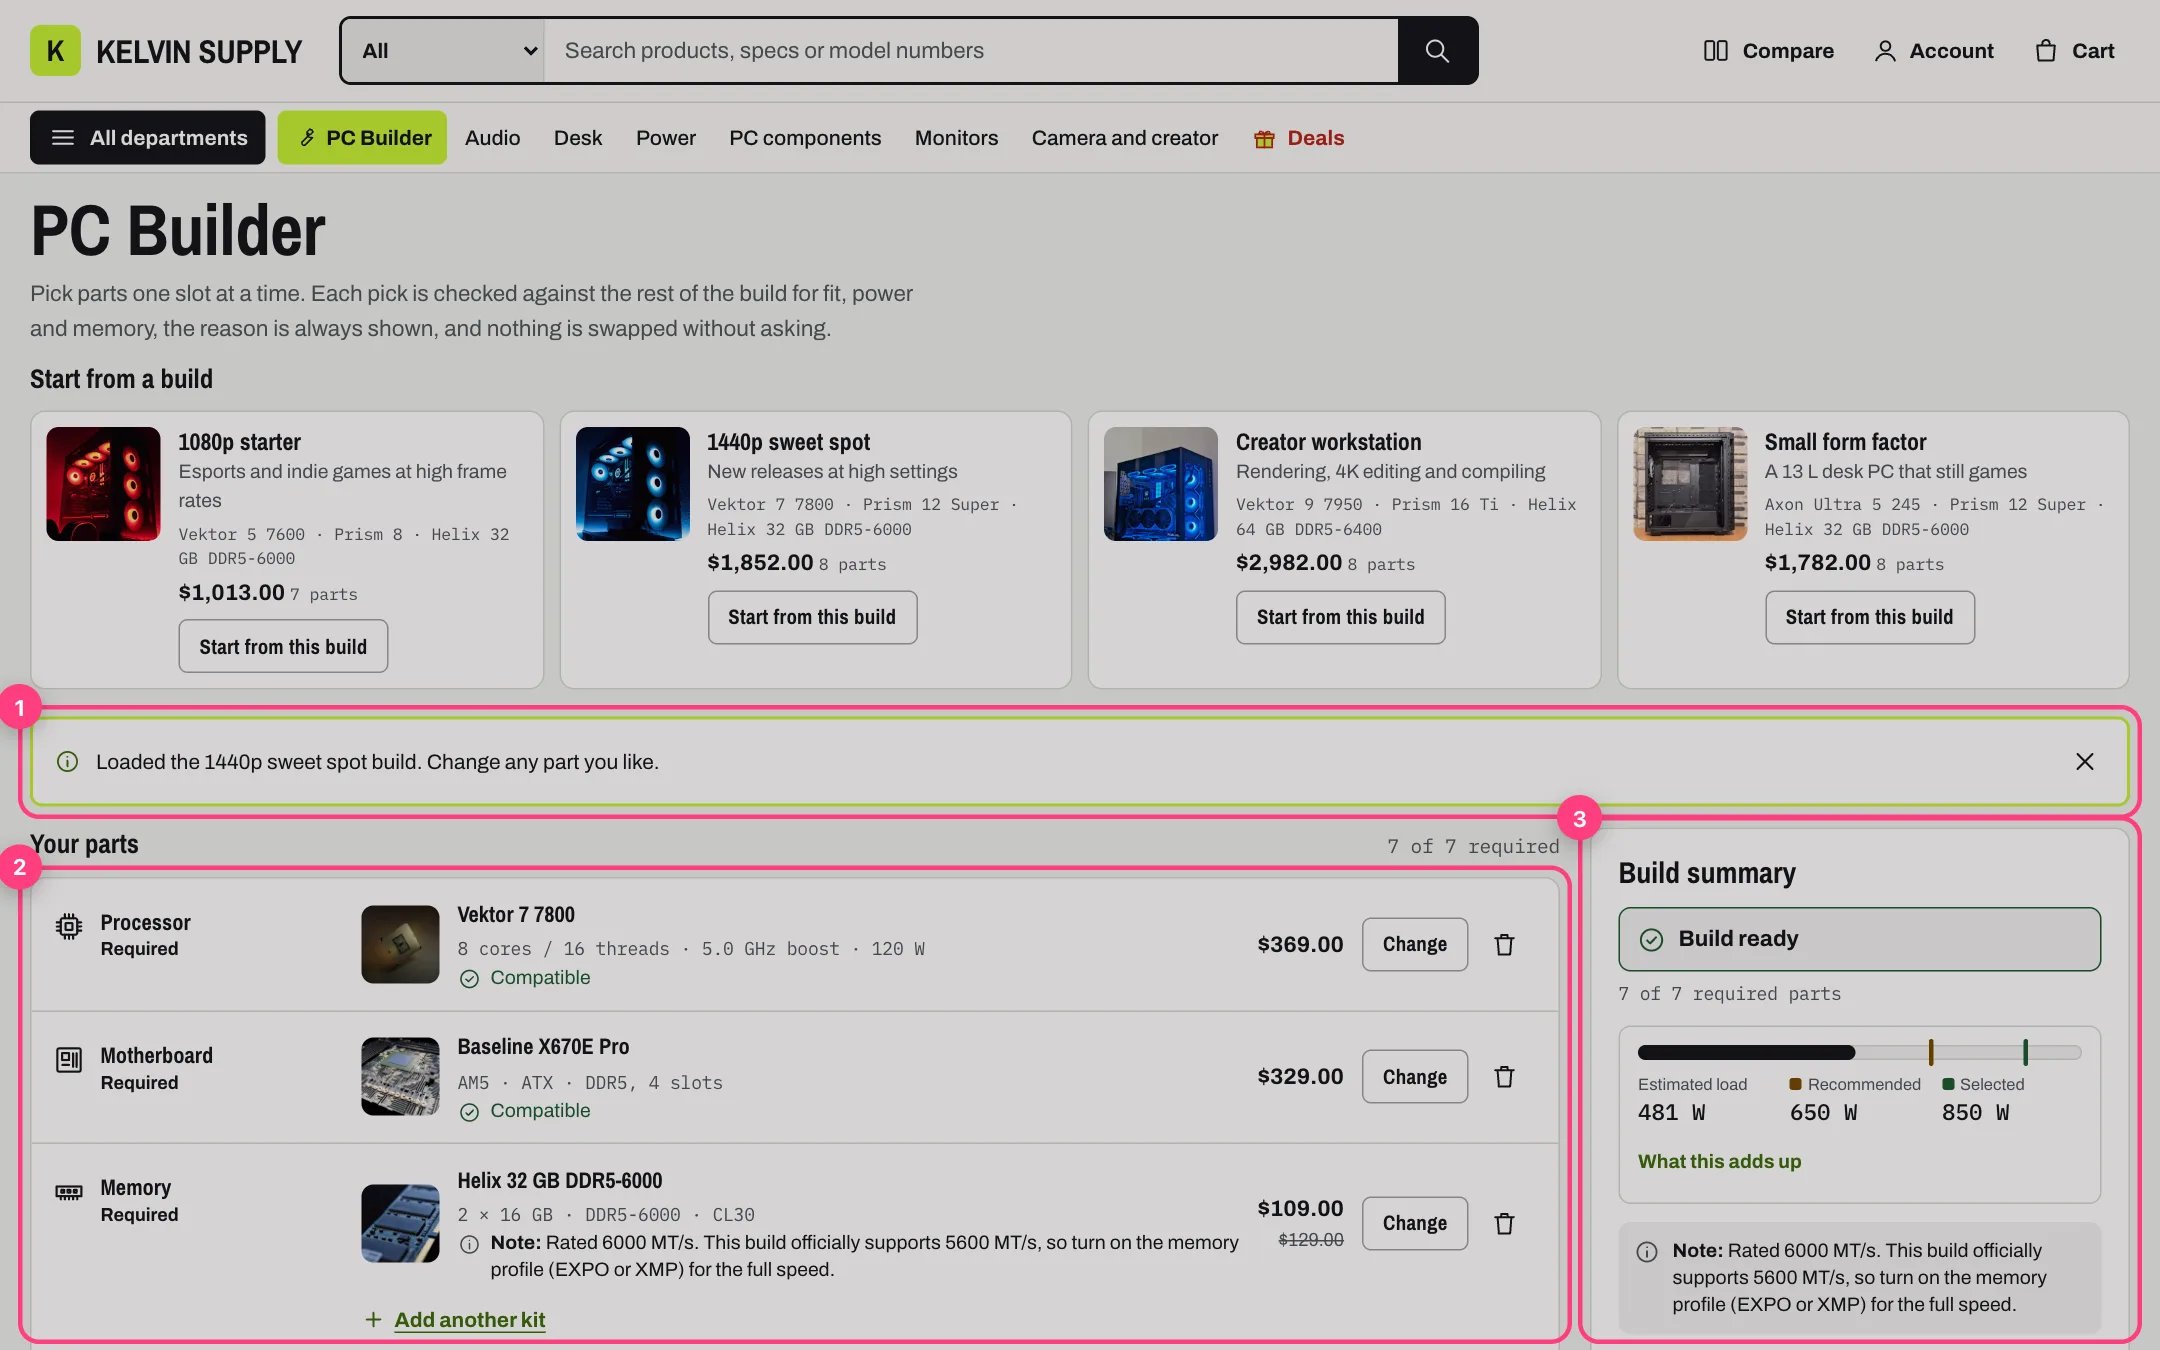
- The message after loading a preset. 2. The parts, slot by slot. 3. The build summary with the power estimate
What shoppers get
Slots. One row per kind of part: Processor, Motherboard, Memory, Graphics card, Storage, Case, CPU cooler, Power supply, Case fans, Monitor, and Keyboard, mouse and dock. Shoppers fill them in any order.- Processor, Motherboard, Memory, Storage, Case and Power supply are required.
- A graphics card is required unless the chosen processor has integrated graphics, and a CPU cooler unless the processor comes with one. Until a processor is chosen, both count as required.
- The summary counts them, such as 5 of 8 required parts, and Add build to cart names the parts still missing.
- A search box (name, brand, product type and spec line), Sort (Compatible first; Price, low to high; Price, high to low; Name) and a Compatible only switch.
- With Compatible only on, parts that would break the build are hidden behind a Show 2 incompatible parts and why button. With it off, they stay in the list, dimmed, with up to two reasons and a disabled Incompatible button.
- Each row shows the price, the difference to the part it would replace, a menu for products with several variants, and Out of stock or Pre-order.
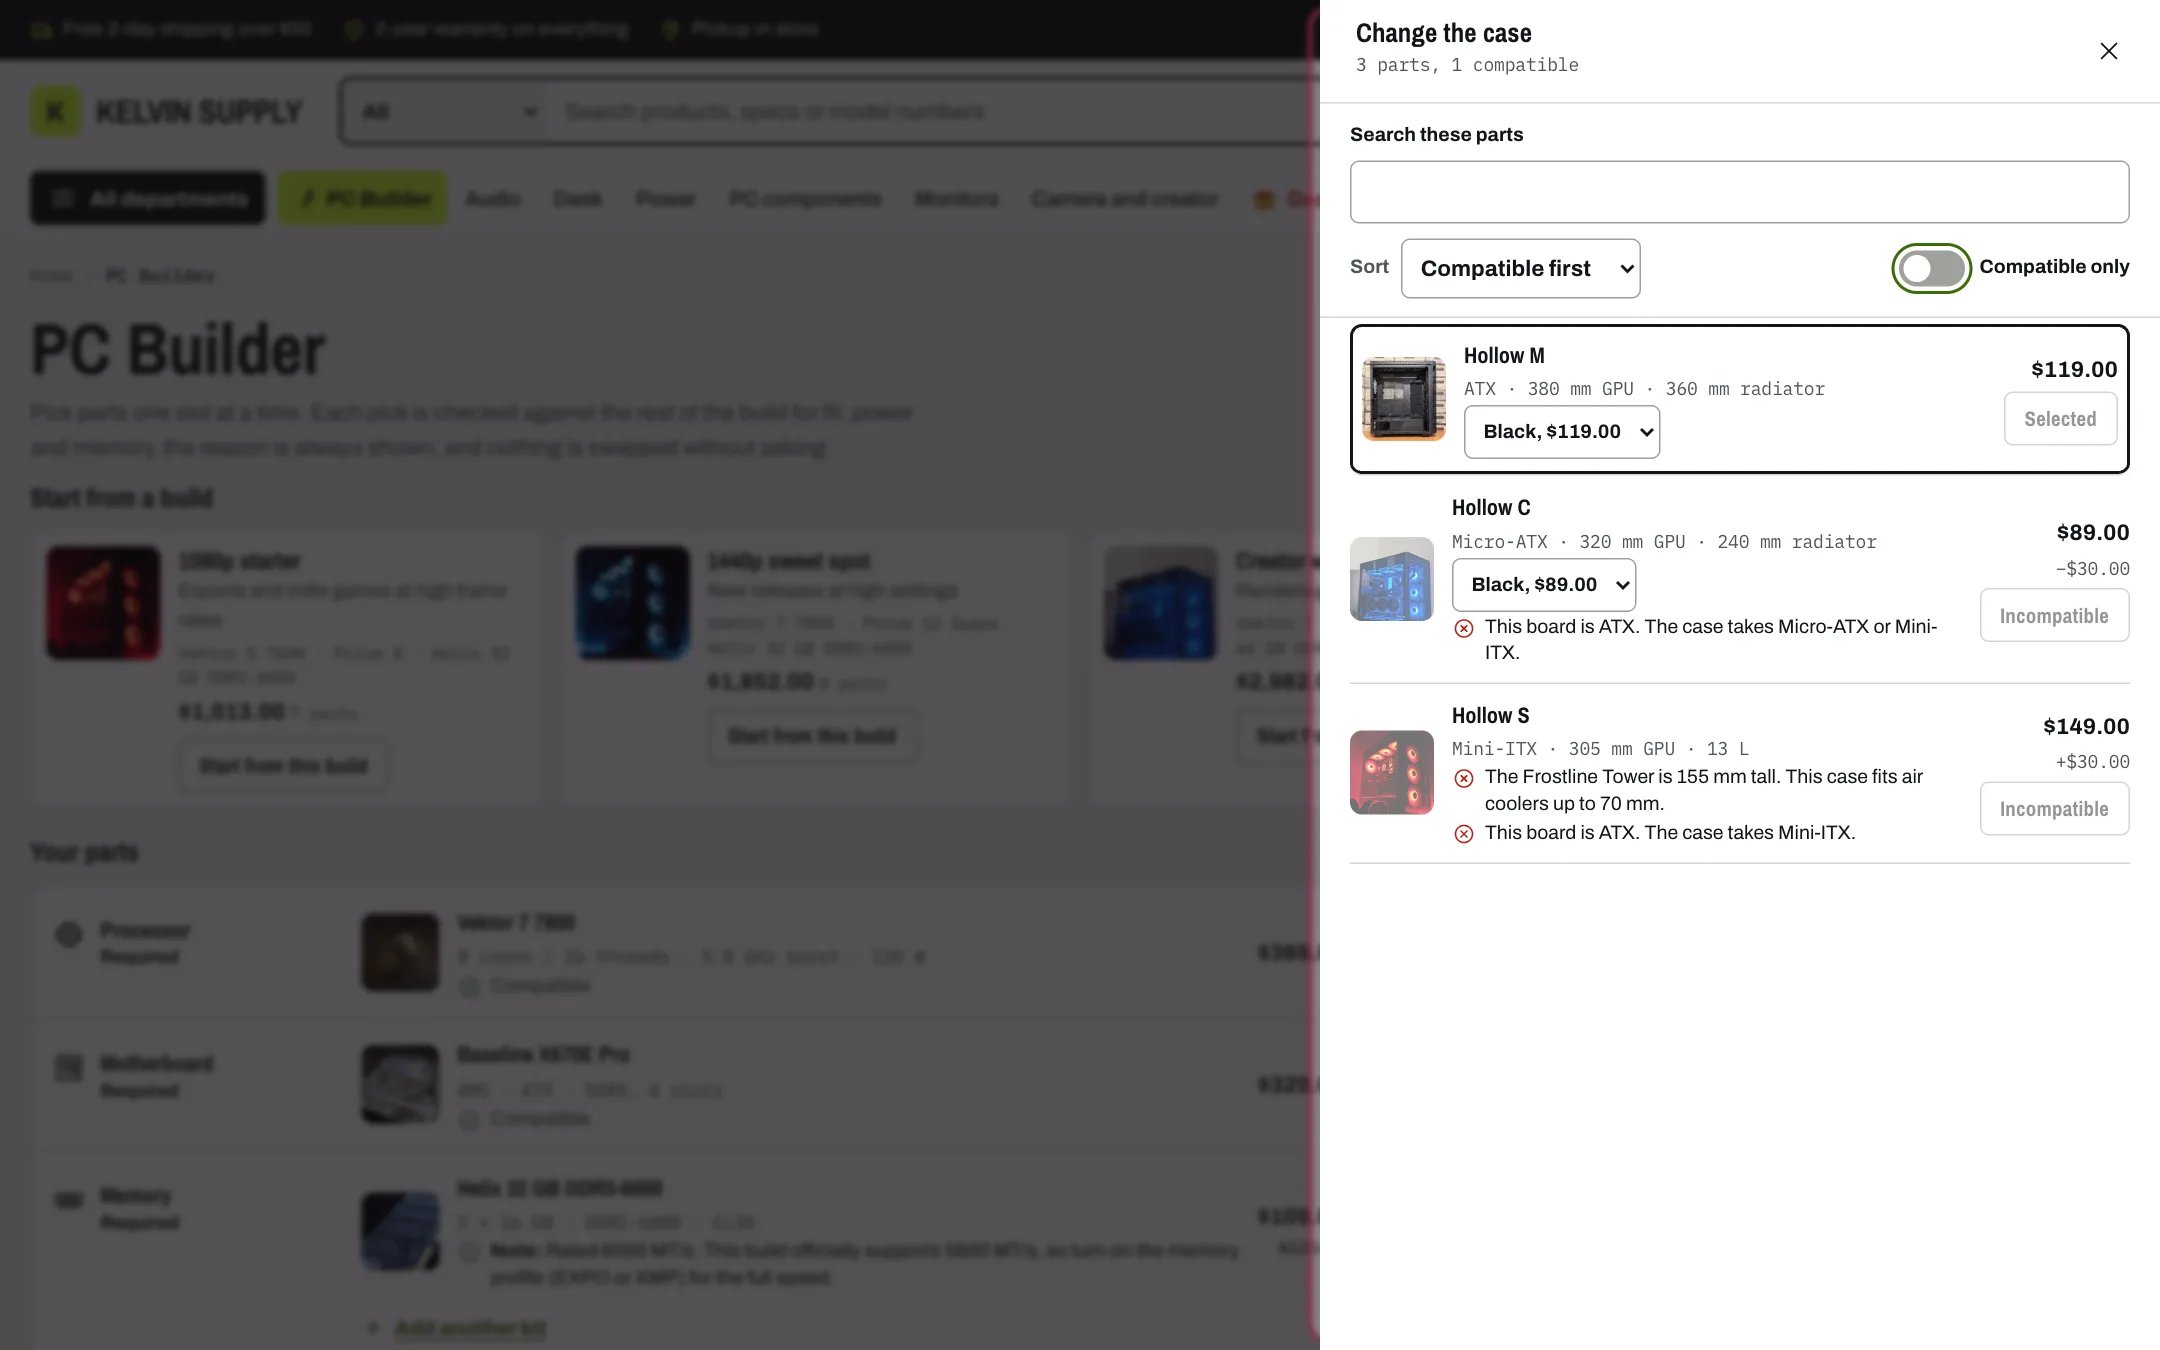
The parts list with Compatible only off: each case that does not fit says why
Fix buttons. Under each error and check, Kelvin offers an in-stock part for one of the slots involved: the one with the smallest price change that clears the problem without adding a new error. It reads Use (part) with the price difference, or Add (part) with its price when the slot is empty. Pre-orders are offered last. A fix is never applied without a click.
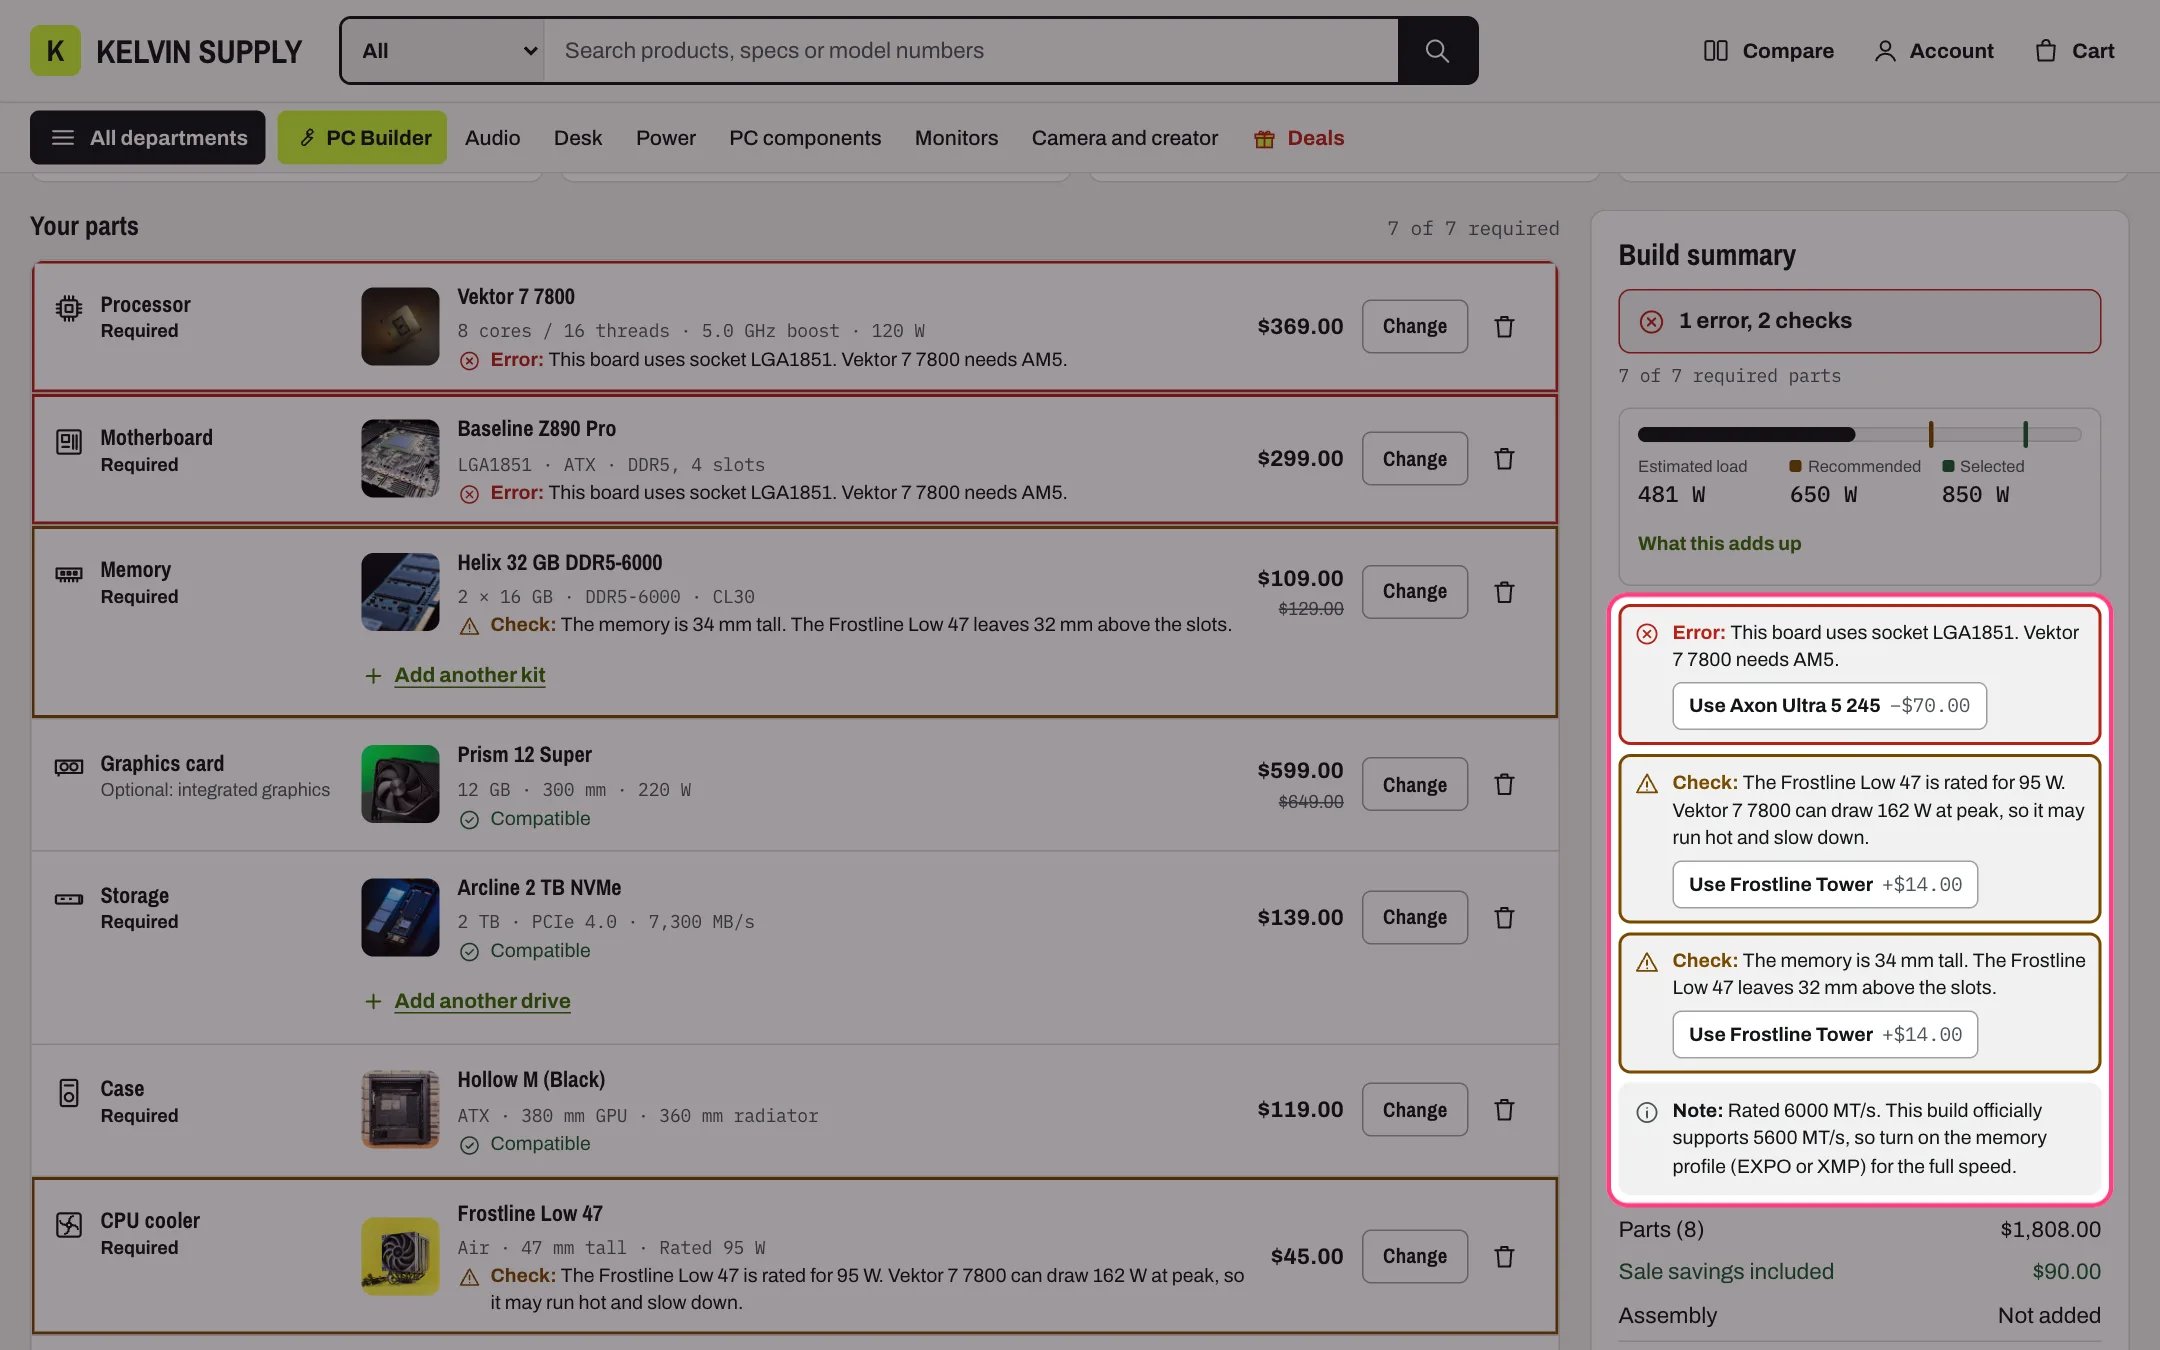
An error with its fix, two checks and a note: Add build to cart stays disabled until the error is fixed
The power estimate. The summary shows the Estimated load, the Recommended power supply and the Selected one on a meter, with What this adds up listing every input. See The power estimate below.
Presets. Preset builds show as cards above the parts, under Start from a build. Start from this build replaces the current build with the preset’s parts and says Loaded the (name) build. Change any part you like. An Undo button brings the previous build back.
Share and print.
- Copy link copies the page address with the build in it. Anyone who opens it sees the same parts, the assembly choice and the slots marked I already have one.
- Copy as text copies a plain parts list with prices, the total, the power estimate, every check and the link.
- Print prints the parts and the summary without the rest of the page.
- The build in progress is saved on the shopper’s device after every change and comes back on their next visit. The home page’s PC Builder entry links back to it.
- Save build keeps a named copy (up to 40 characters) under Saved builds, with Load and Delete. Load replaces the current build, with Undo. Shoppers can keep 10 saved builds; for an eleventh they are asked to delete one.
- Start over asks for a second press within four seconds, then offers Undo.
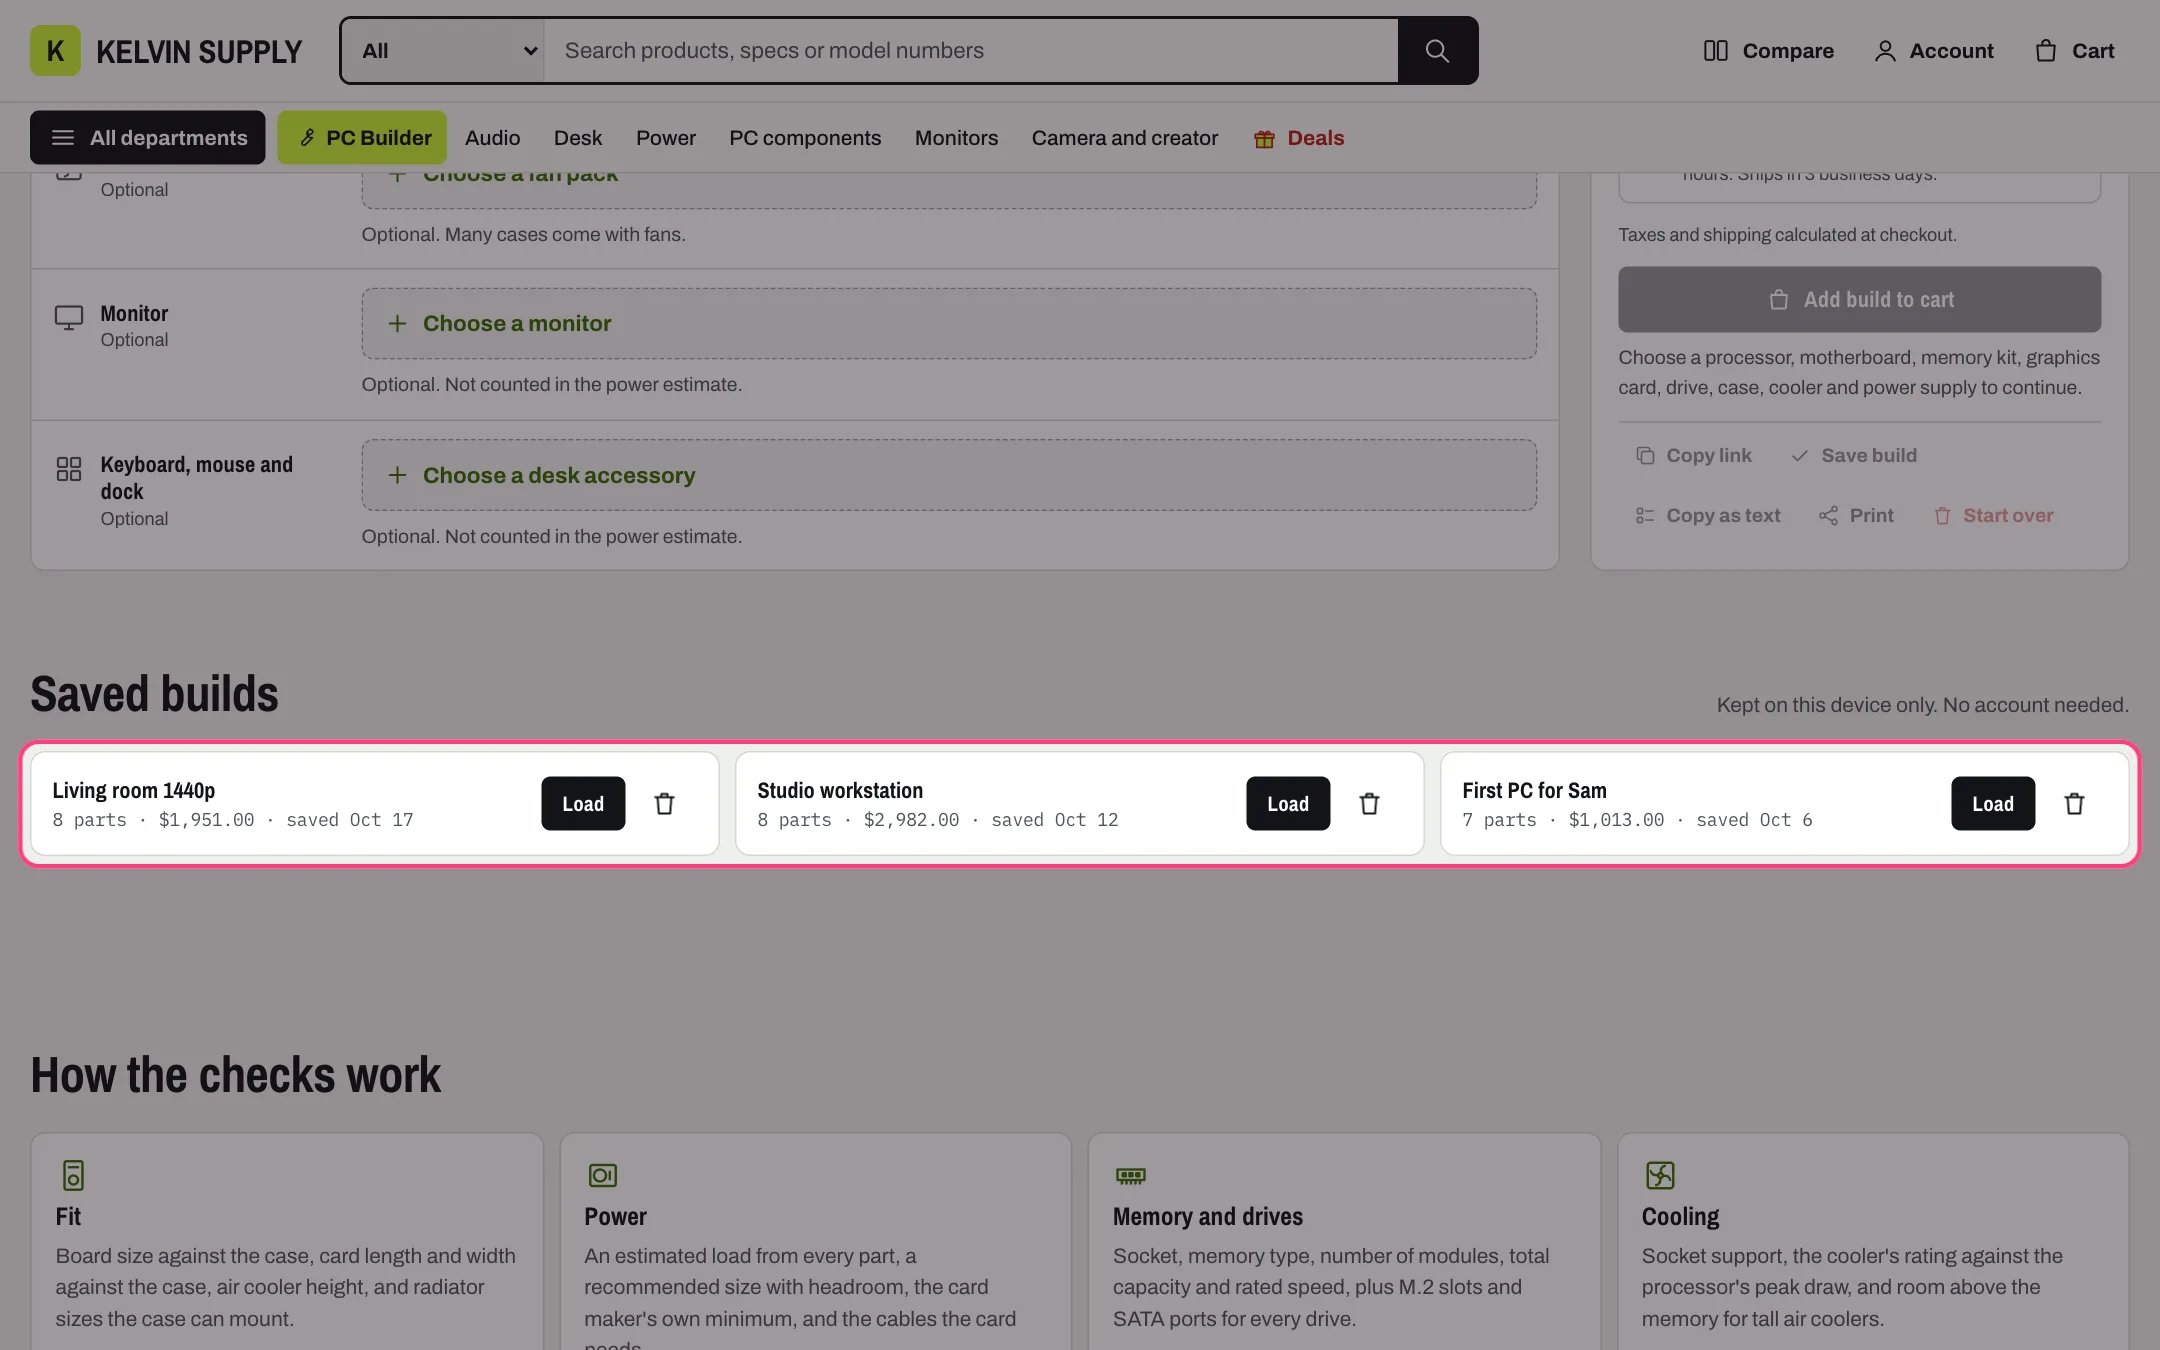
Saved builds, kept in the shopper's browser on that device
- Pressing it again for the same build in the same visit asks This build is already in your cart, with Add another and Cancel.
- If Shopify refuses a part (sold out, or above a quantity limit), none of that build’s lines stay in the cart, and the message names the part when Shopify says which one it was.
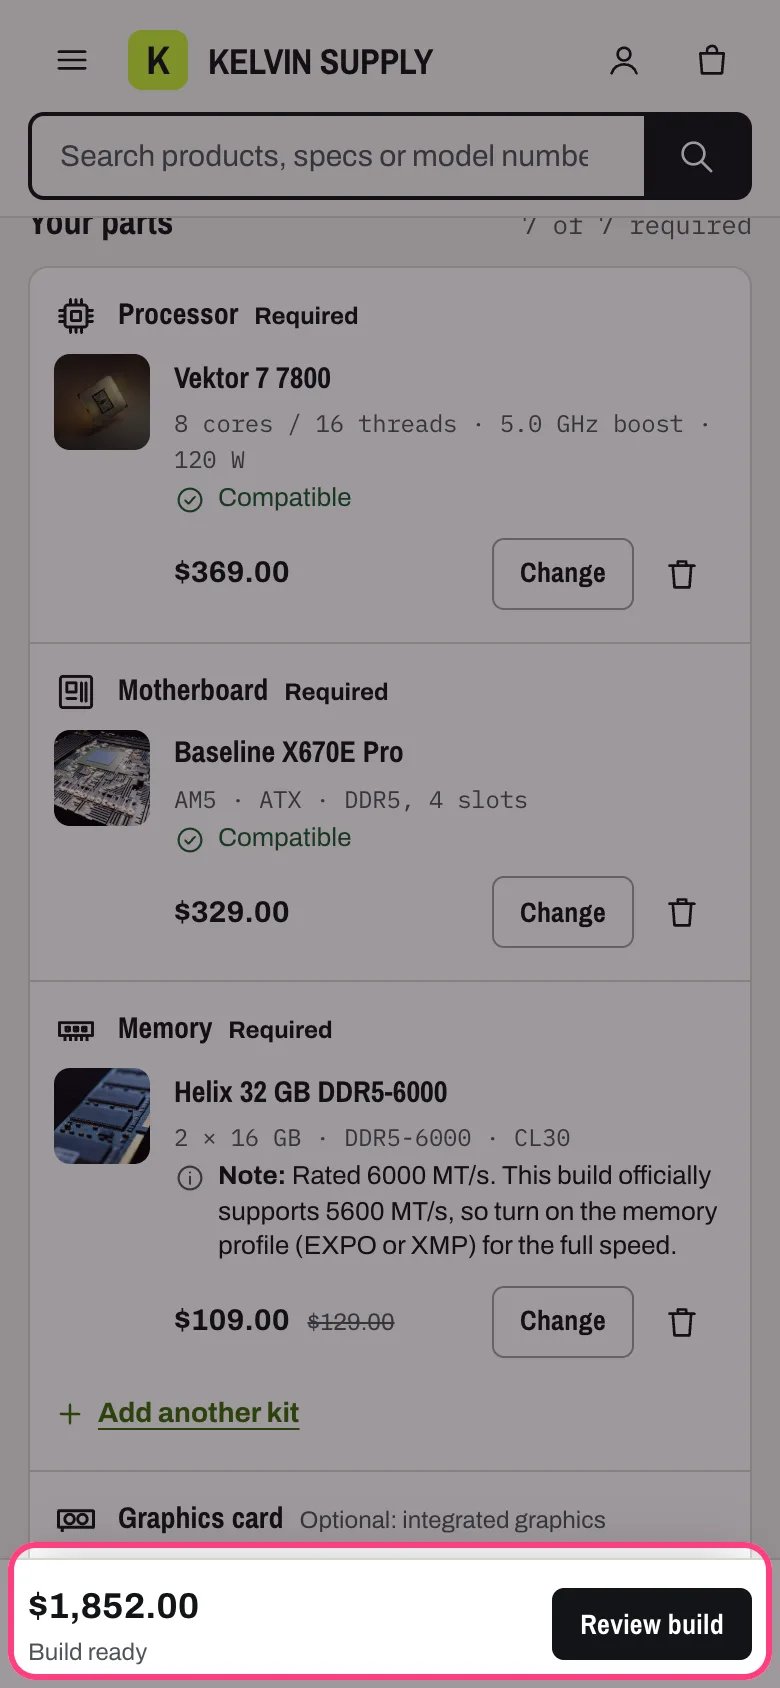
On a phone, the bottom bar keeps the total and the status in view
Set it up
1. Create the page. In the Shopify admin go to Online Store → Pages → Add page, name it PC Builder (or anything you like), choose pc-builder under Theme template and save. The template holds the PC Builder section with all 11 Slot blocks. 2. Choose it in Theme settings. In the theme editor open Theme settings → PC Builder and pick the page under PC Builder page. Every link to the builder uses this page: the header’s PC Builder link (Header → Show the PC Builder link), the PC Builder entry on the home page, Add to a PC build on product pages, Edit build in the cart and the saved builds on the account page. 3. Put each kind of part in a collection. Create one collection per slot, such as Processors, Motherboards, Memory, Graphics cards, Storage, Cases, Power supplies and Cooling. Automated collections by product type are the easiest to keep up to date. Parts can be in other collections too; the builder only looks at the slot collections. 4. Connect the slots. Choose Pages → pc-builder in the theme editor’s page selector, select the PC Builder section and open each Slot block:
Delete the Slot blocks for parts you do not sell, or leave their collection empty.
How parts find their slot. Slots match products by collection only: a slot lists the products of its Parts collection, narrowed to Only parts with this tag when that is filled. A part that arrives from a preset, a link or a product page goes into the first slot, in block order, whose collection (and tag) holds it. Kelvin does not read slot tags by itself: tags such as
slot:cooler on the demo store are only there for Only parts with this tag, and any tag works. Type the tag exactly as it is on the products.pc-part) show the PC compatibility box on their product page, with their build specs and Add to a PC build. The tag does not decide what the builder lists; the slot collections do.
7. Review the section settings.
Build specs (metafields)
The checks read product metafields in the namespacespecs. Create each definition once in Settings → Custom data → Products (Settings → Metafields and metaobjects → Products in newer admins): Add definition, Namespace and key such as specs.socket, and the type below. Then fill them on each part, one product at a time or in bulk with the bulk editor.
How values are read.
- Numbers are plain numbers in the unit the key names:
_mmmillimeters,_wwatts,_gbgigabytes,_mhzmegatransfers per second (the MT/s on memory kits). - Text is compared without regard to capitals, spaces or punctuation, so AM5 matches am5 and Micro-ATX matches micro ATX. Common short forms are understood: mATX and uATX for Micro-ATX, ITX and mITX for Mini-ITX, Extended ATX for E-ATX, liquid or water for aio, reverse for back_connect.
- A list can be a list metafield or one line with values separated by commas.
- Use the same spelling on both sides of a rule: if processors say LGA1851, motherboards and coolers must say LGA1851 too.
Processor
Motherboard
Memory (one kit)
Graphics card
Storage
Power supply
Case
CPU cooler
Case fans
Monitors and keyboards, mice and docks have no checks and are not counted in the power estimate. Their Spec columns can use any key from Spec rows.
The power estimate
Kelvin adds up an estimated load from the parts in the build:- processor:
peak_power_w, ortdp_wwithout it; - graphics card:
tdp_w; - motherboard: its
tdp_w, or Motherboard allowance (default 40 W); - memory: 5 W per module;
- drives: 5 W each, 8 W per hard drive, or the drive’s
tdp_w; - CPU cooler: 5 W for air, 15 W for liquid, or the cooler’s
tdp_w; - fans: 3 W per fan, counting the case’s
fans_includedand each pack’sfan_count; - Allowance for everything else (default 30 W).
recommended_psu_w. For example, a processor that peaks at 162 W, a 220 W graphics card, the 40 W motherboard allowance, two memory modules (10 W), one drive (5 W), an air cooler (5 W), three case fans (9 W) and 30 W for everything else make 481 W. Plus 30% is 625 W, rounded up to 650 W.
The selected power supply is then checked: below the load is an Error, below the recommended size a Check that names the headroom and the size to choose, and more than two and a half times the load a Note that a smaller unit would do.
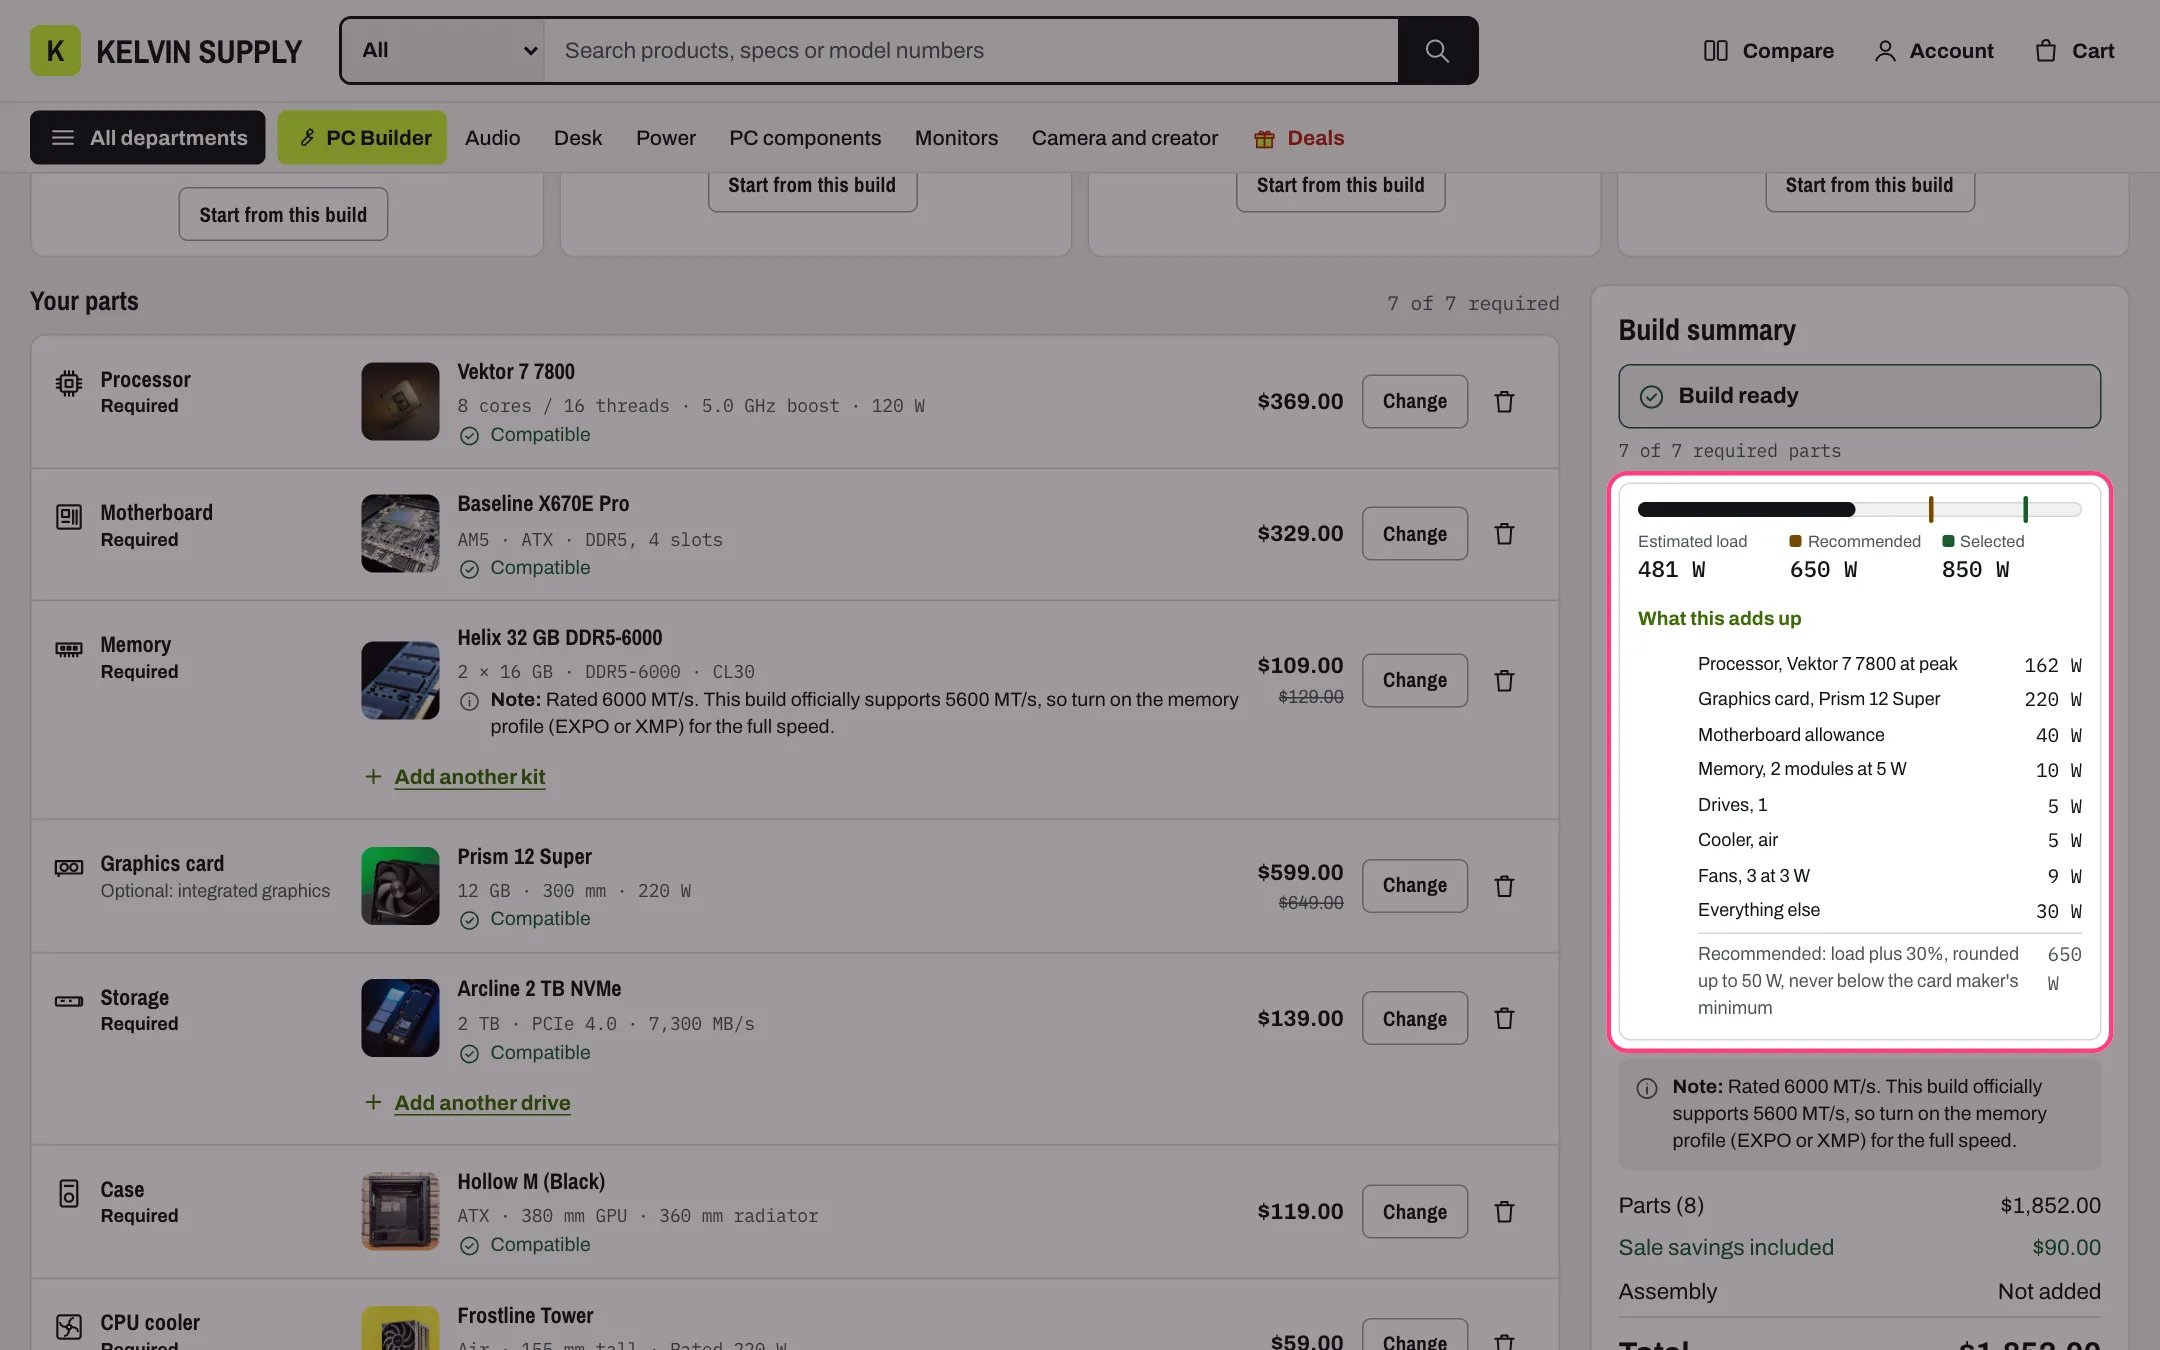
Estimated load, recommended and selected power supply, with What this adds up open
Presets
Add Preset build blocks to the PC Builder section: Name, Note, Image (empty uses the first part’s photo) and up to 12 Parts. Each part goes into the first slot whose collection holds it. The card shows the sum of the parts’ current prices, the number of parts and a line naming the processor, graphics card and memory. When a shopper loads a preset, parts that are sold out, in no slot’s collection, or more than a slot allows are left out and named after Left out, not in any parts list. Link to a preset. Add?preset= and the Preset build block’s ID to the PC Builder page address, for example /pages/pc-builder?preset=preset-sweet. It loads the preset as its Start from this build button does, with Undo to the shopper’s previous build. A block ID that starts with preset- also works without that prefix, so ?preset=sweet loads preset-sweet. The link is ignored when it also carries a build (?b=, ?add= or ?parts=).
Find the block ID. The theme editor does not show it. Go to Online Store → Themes, open the theme’s … menu, choose Edit code and open templates/page.pc-builder.json: each preset is a block of type preset, and the name in front of it is its ID, next to the title you gave it. The ID stays the same while the block exists; if you delete a block and add a new one, update your links.
Links into the builder
Every build lives in the page address, so any link can open the builder with parts in it. Parts are named by their variant ID: in the admin, open the product, then the variant; the ID is the number at the end of the address.
A link with a build in it replaces the shopper’s build in progress; their saved builds are kept. Parts that are sold out or no longer in their slot’s collection are left out with a message, and a part in no parts list is not added (That part is not in any of the builder’s parts lists, so it was not added.).
Builds in the cart
Each part is a normal cart line, and every line of one build carries three line item properties:
The cart drawer and the cart page group a build’s lines under PC build and its name, with the number of lines and the build total, after the other lines.
- A line under the group says Assembled and stress-tested before it ships. when the build has the assembly line, or Shipped as parts. Add assembly in the PC Builder. when it does not. Change these words in Edit default theme content if your service differs.
- Edit build opens the builder with the build’s parts (and assembly). Remove build takes all its lines out of the cart.
- Each line keeps its own quantity buttons and Remove.
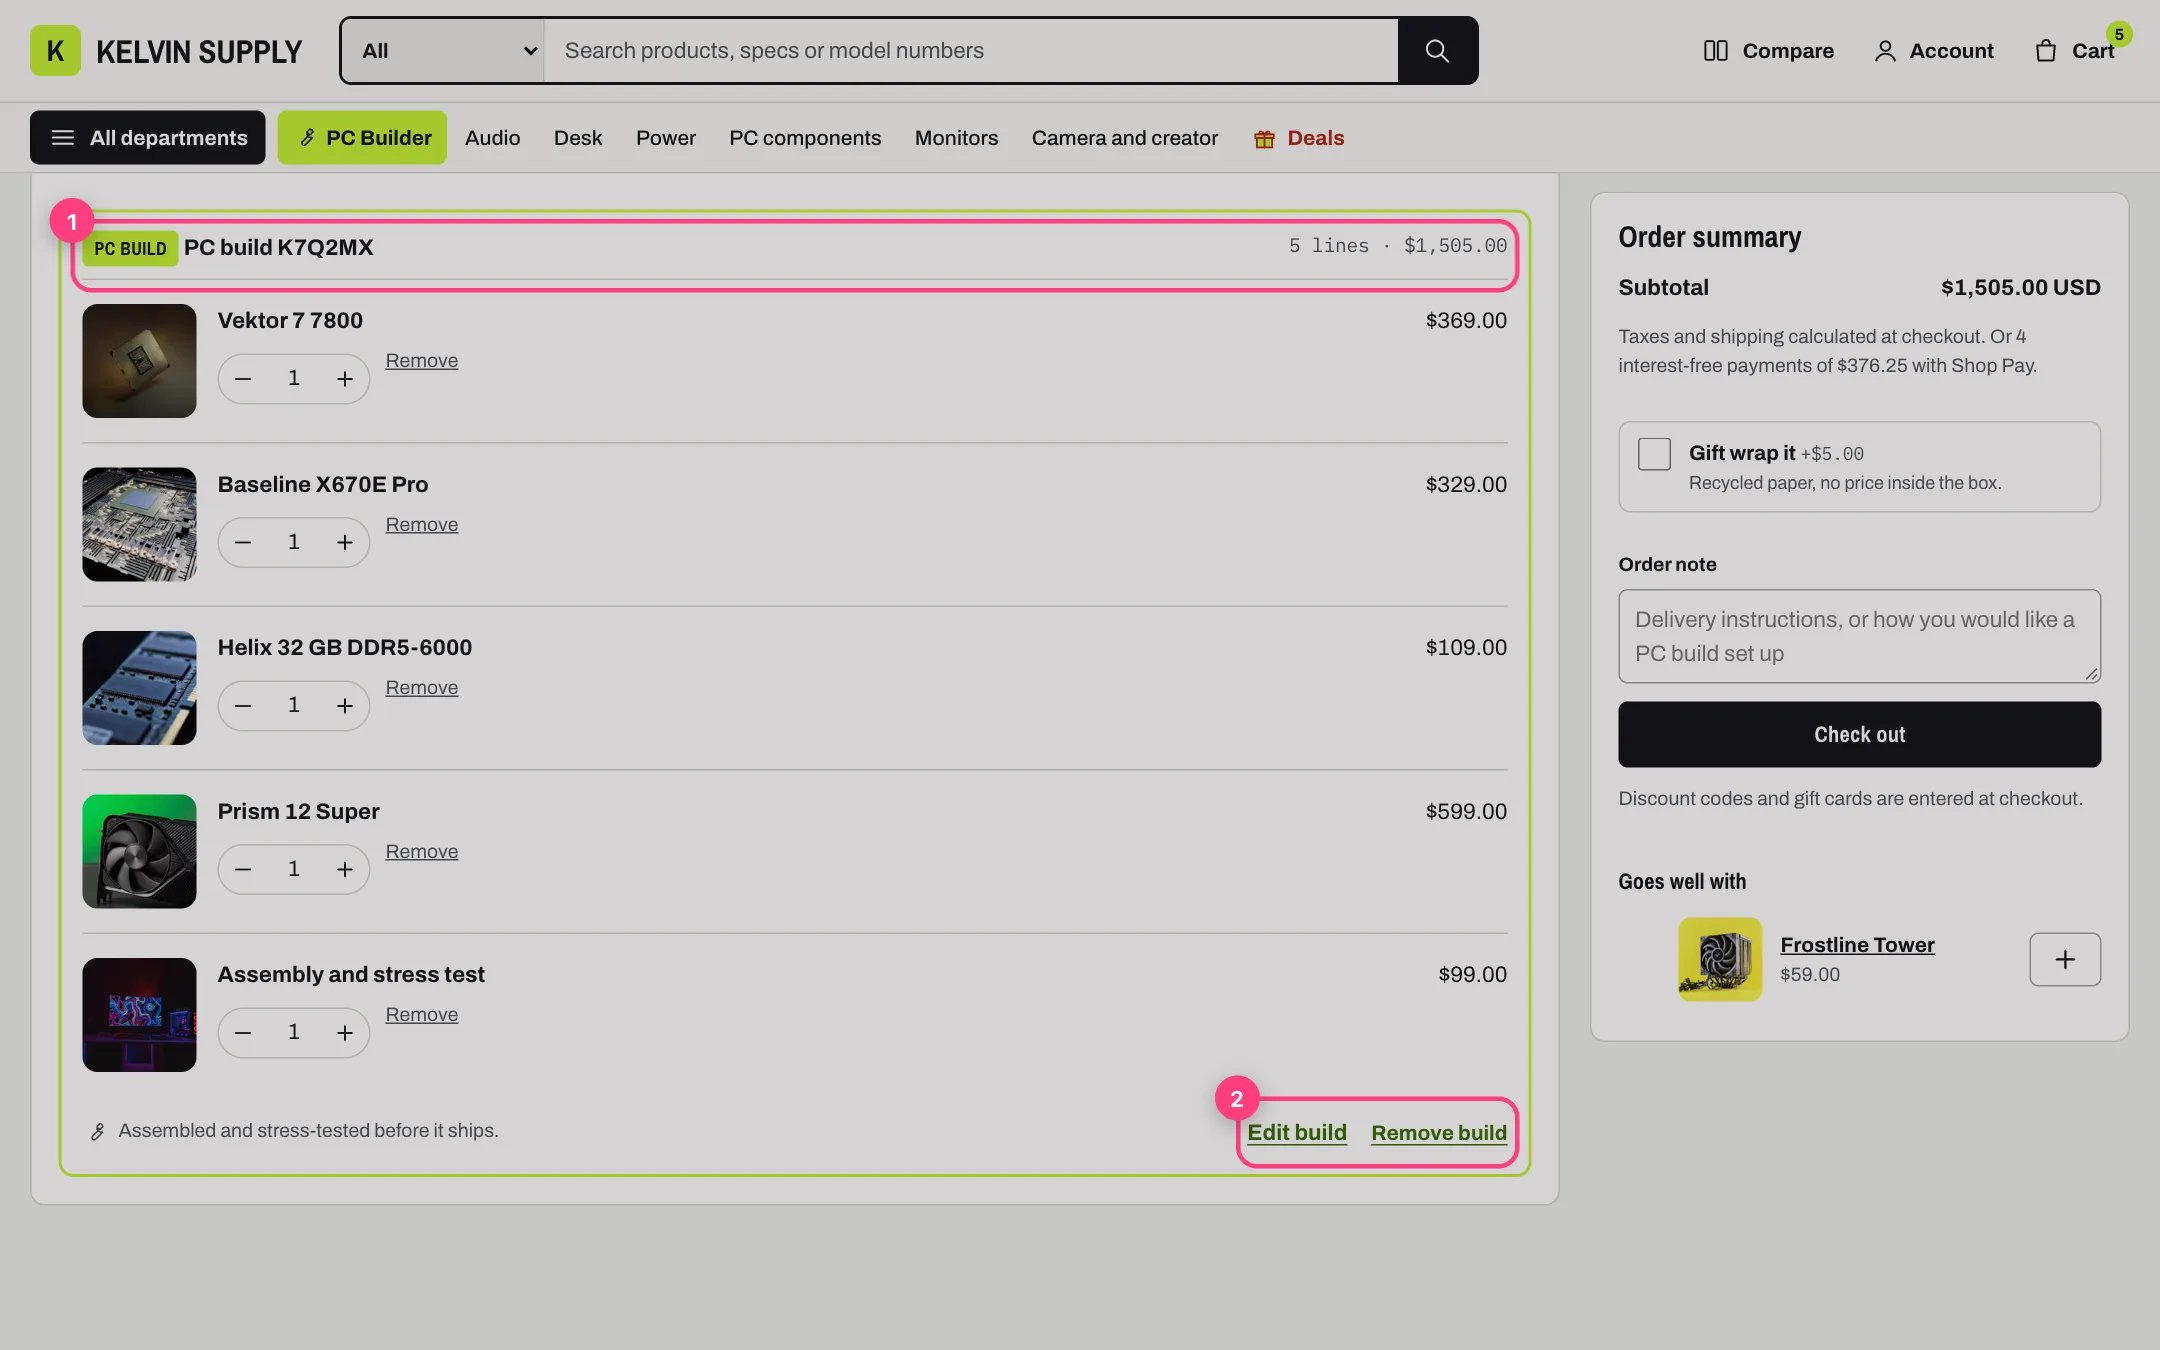
- The build name, its lines and total. 2. Edit build and Remove build
Assembly service
Create a product for your build fee, such as PC assembly, priced at what you charge, and choose it in the PC Builder section’s Assembly product. The summary then offers a checkbox, Add (product) for (price), with your Assembly description under it, for example: We build it, update the BIOS and test it for 24 hours.- Select assembly for new builds ticks it in advance.
- When ticked, the assembly is one more line of the build, with
_Slotset to service. - If the product is sold out, the checkbox is hidden, so set it not to track inventory.
- Leave Assembly product empty to sell parts only.
Elsewhere in Kelvin
- Home page: the PC Builder entry section has a start button, its own presets, and a Continue your build: 7 parts, (total) link to the shopper’s build in progress.
- Product pages: on products with the Parts tag, the PC compatibility block of Product information lists the build specs the product has, its
specs.compat_note, and Add to a PC build (block setting Show Add to a PC build). The button opens the builder with the selected variant, when it is in stock and the PC Builder page is chosen. - Header: Show the PC Builder link and PC Builder link label in the Header section.
- Account page: the saved builds from this device, each with Open in PC Builder.
- Cart: grouped builds with Edit build and Remove build.
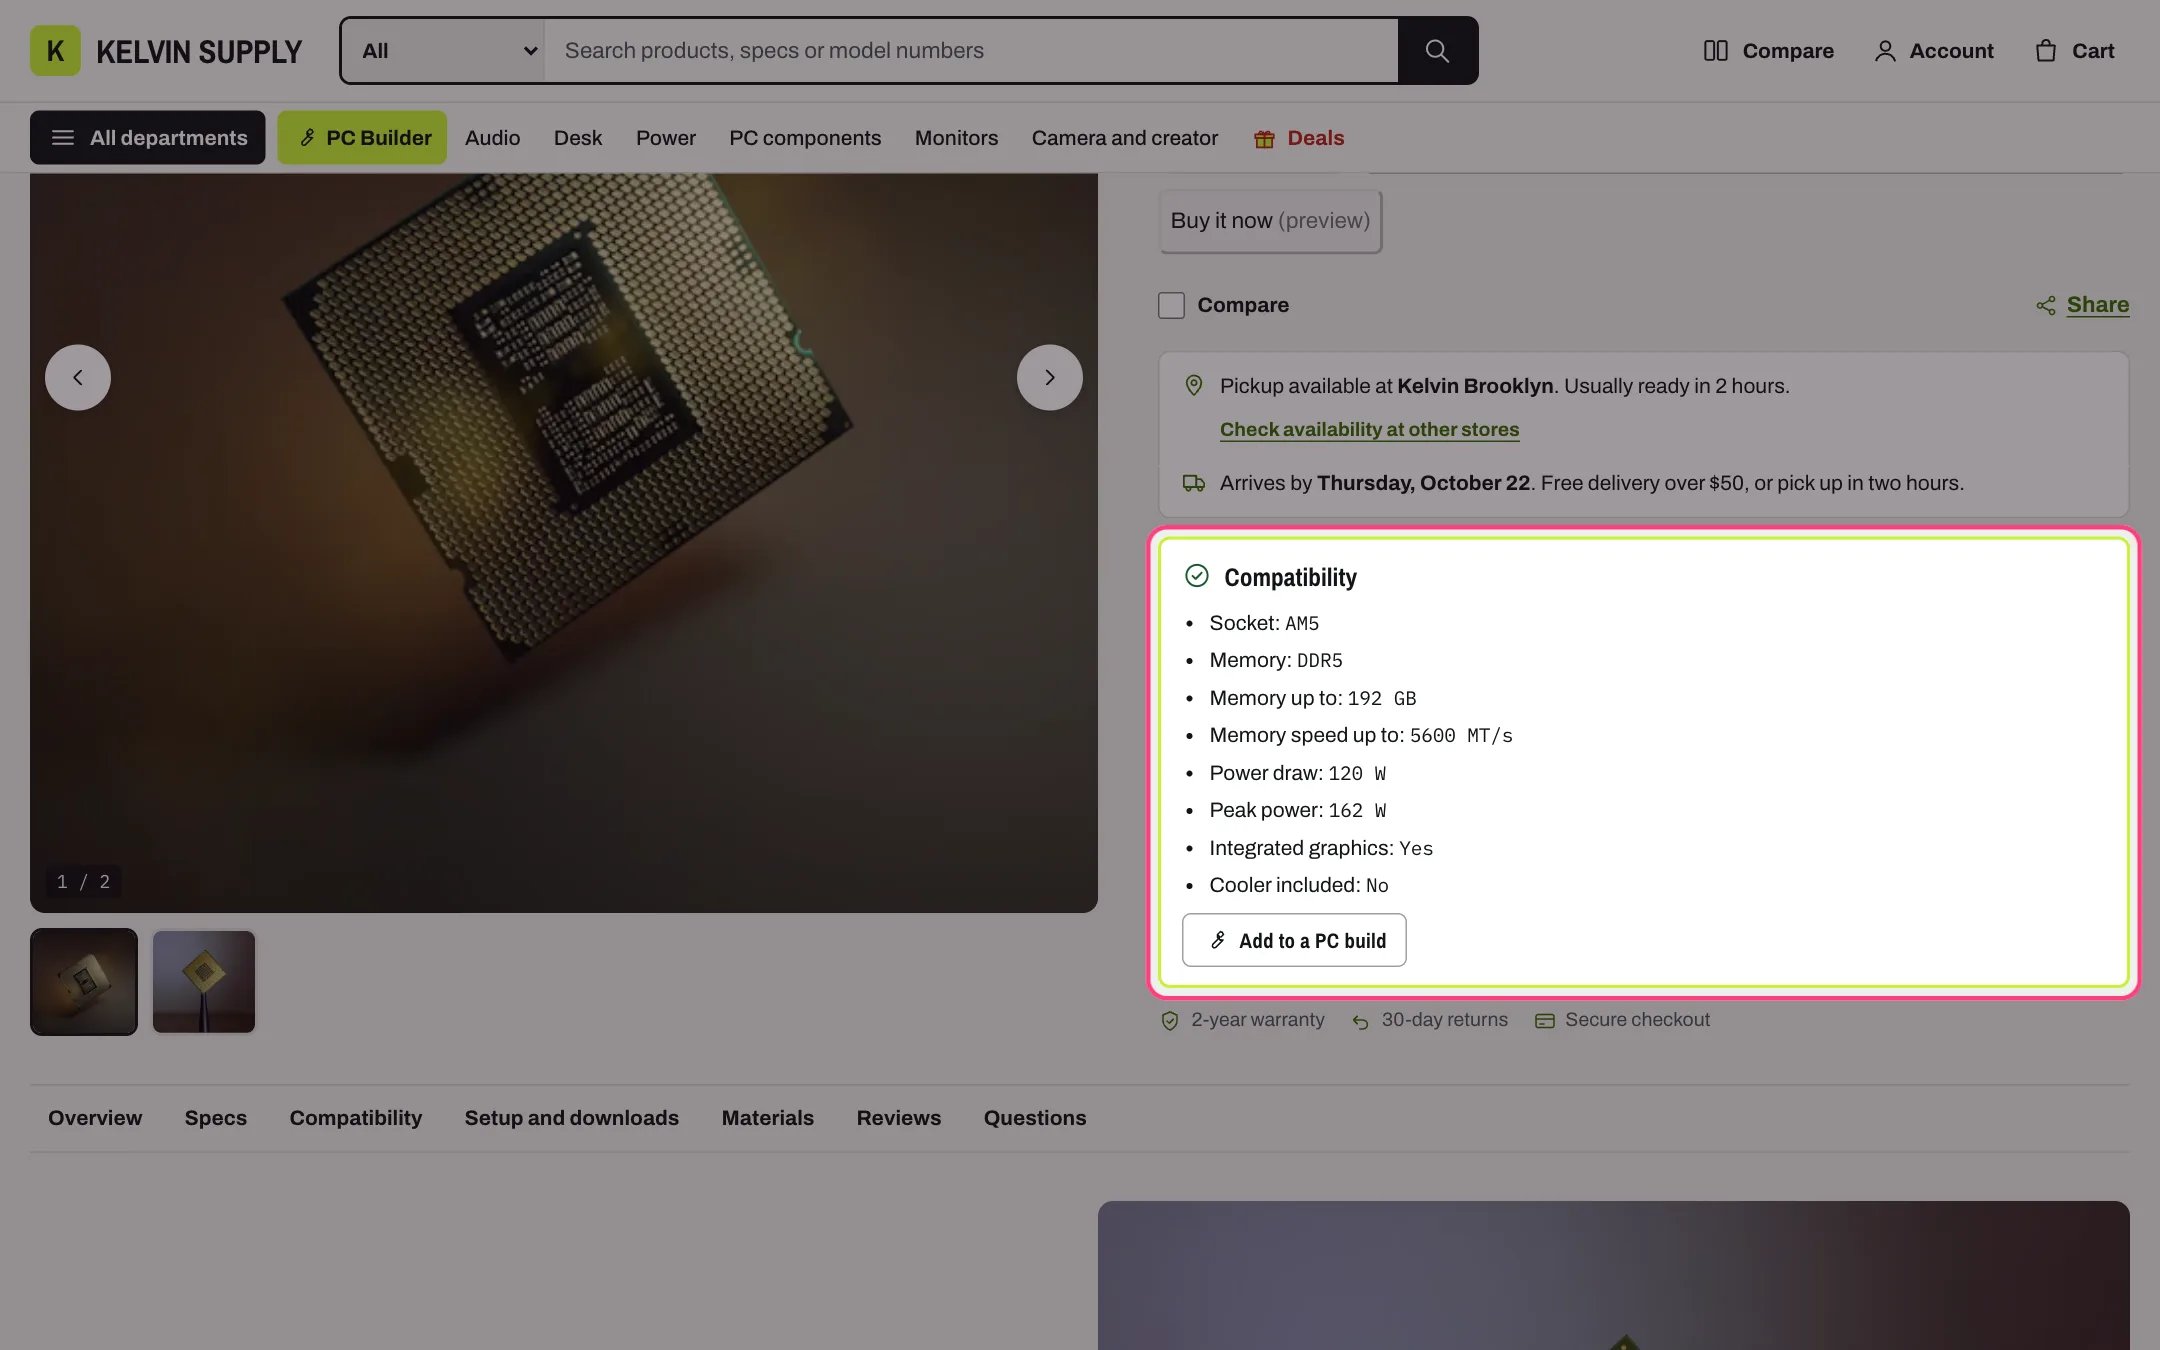
The PC compatibility box with Add to a PC build
Limits
- Everything happens in the shopper’s browser and your store. Parts, prices and stock come from your own collections; no request goes to an outside service and no app is needed.
- Builds are not stored in Shopify or in a customer account. The build in progress and up to 10 saved builds stay in the browser on that device: another device, another browser or cleared browsing data starts empty. Shoppers share a build with Copy link.
- The checks cover only the rules above, and only with the specs you fill in. They cannot know about anything that is not in your metafields, and the power figure is an estimate, not a measurement.
- A build is a set of normal cart lines, not one product: stock, prices, taxes and discounts work per part, and Shopify charges the current price at checkout. Nothing is reserved while a shopper builds.
- Each slot lists up to 500 products and up to 25 variants per product. Parts lists are kept in the browser tab for 10 minutes, so a new price or stock level can take that long to appear in the list.
- The builder never swaps a part on its own and never adds anything to the cart without Add build to cart.
Troubleshooting
- A slot says No parts in this category yet. Its Slot block has no Parts collection, the collection is empty, or Only parts with this tag matches no product.
- A preset or a link leaves a part out. The part is sold out, in no slot’s collection, or missing the slot’s tag.
- Every part says Specs missing. Check that the namespace is
specsand that the key is spelled exactly, such asspecs.socket. - Two parts that fit are marked incompatible. Compare the values on both sides: socket, memory type and size names must match (capitals and spaces do not matter).
- A shopper lost a build. Builds live in the browser where they were made. Ask for the Copy link address, or look at the Build name on their order.
In the theme editor
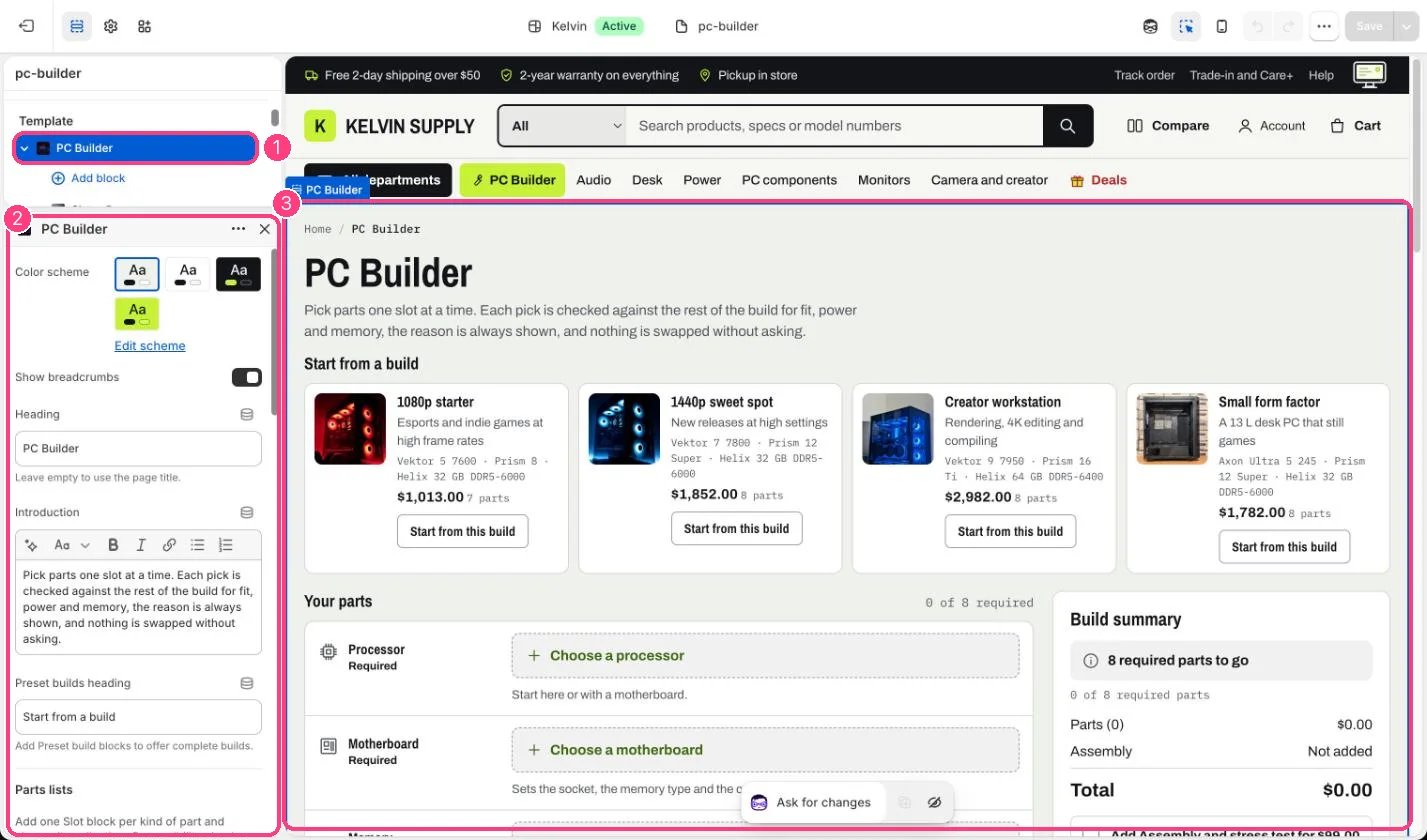
1 PC Builder, on the pc-builder page; each slot and preset is a block · 2 its settings · 3 the preview
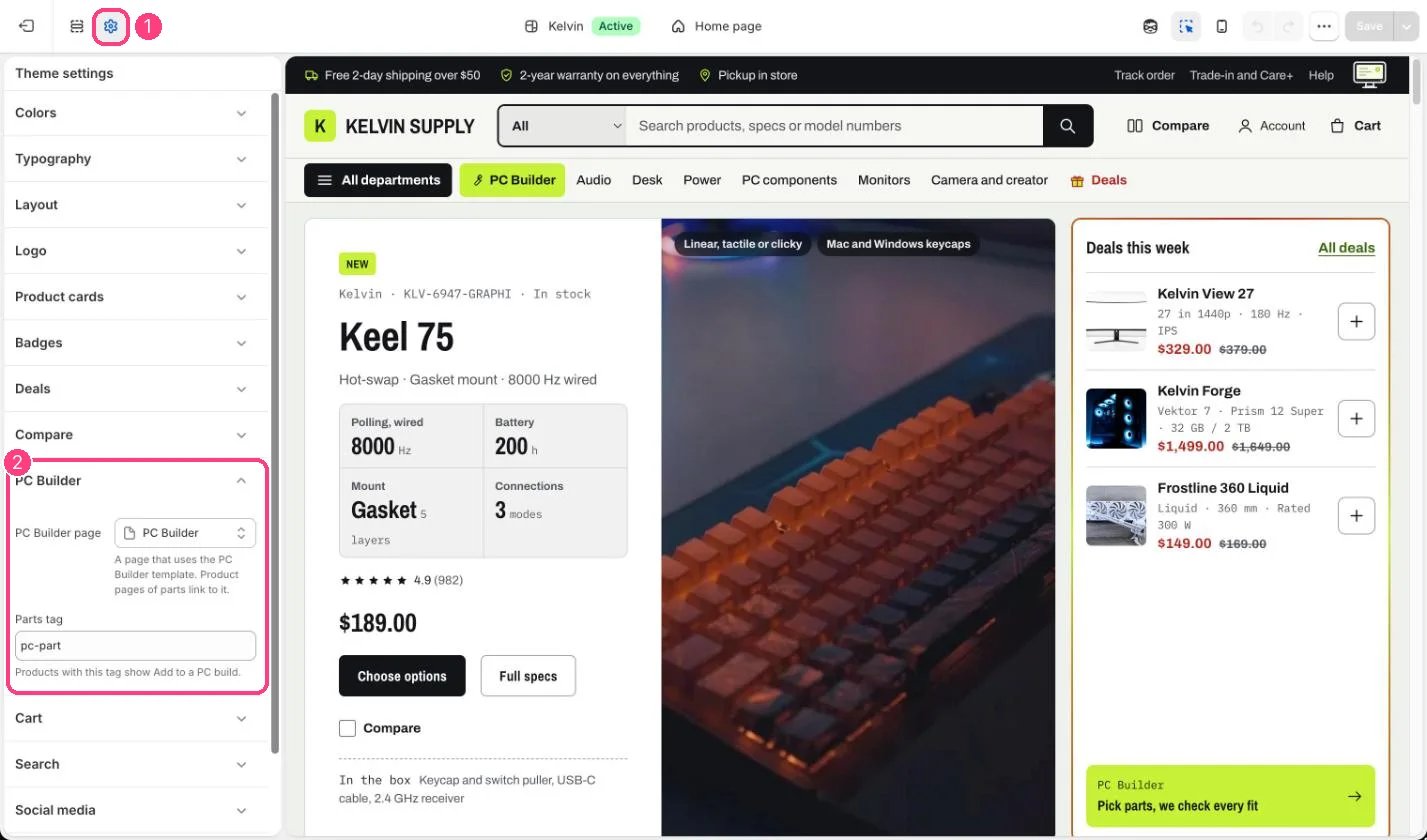
The PC Builder page and the parts tag: 1 Theme settings · 2 PC Builder